How to tie a bow might seem like a simple task, but it's a skill that can add a touch of elegance and sophistication to a variety of occasions. Whether you're dressing up for a formal event, wrapping a gift, or adding a decorative touch to your home décor, knowing how to tie the perfect bow is an invaluable skill. With the right techniques and a bit of practice, anyone can learn to tie beautiful bows that impress.
In this comprehensive guide, we will explore the various methods of bow tying, from the classic bow tie worn with formal attire to the intricate bows that adorn gift boxes and decorations. You'll discover step-by-step instructions, tips, and tricks that will help you master this timeless art. Whether you're a beginner or looking to refine your skills, this article will provide you with all the information you need to become an expert in bow tying.
Through a blend of easy-to-follow instructions and expert insights, you'll gain the confidence to create bows that not only look stunning but also stand the test of time. So, let's embark on this journey to master the art of bow tying and enhance your ability to add beauty and charm to any setting.
Table of Contents
- Understanding the Basics of Bow Tying
- Different Types of Bows
- Materials and Tools Needed
- Step-by-Step Guide to Tying a Simple Bow
- Tying a Bow Tie
- Creating Gift Wrapping Bows
- Making Decorative Bows for Home Décor
- Troubleshooting Common Bow Tying Issues
- Advanced Bow Tying Techniques
- Maintaining and Storing Your Bows
- Bow Tying in Fashion and Its Impact
- Environmental Considerations in Bow Tying
- Cultural Significance of Bows
- Frequently Asked Questions
- Conclusion
Understanding the Basics of Bow Tying
Before you dive into the art of bow tying, it's crucial to understand the fundamental principles that make a bow both functional and aesthetically pleasing. At its core, bow tying is about creating symmetrical loops and secure knots. The process involves manipulating the ends of a ribbon or fabric to form loops and tails that hang elegantly.
The most basic form of a bow involves forming two loops, crossing them, and pulling one loop through the space created by the cross. This technique can be adapted and modified to create various types of bows, each with its unique style and purpose. Understanding these fundamental principles will set the foundation for more advanced techniques.
As you begin to practice, remember that consistency in size and tension is key to creating a well-balanced bow. The loops should be of equal size, and the knot should be tight enough to hold the shape without causing the fabric to wrinkle or distort. With these basics in mind, you're ready to explore the different types of bows and the materials needed to create them.
Different Types of Bows
Bows come in a variety of shapes and sizes, each serving a different purpose and adding its own charm to whatever it's adorning. Here are some of the most common types of bows you'll encounter:
- Simple Bow: The classic bow consists of two loops and two tails, often used in shoelaces and gift wrapping.
- Ribbon Bow: A decorative bow made with ribbon, perfect for gifts, wreaths, and floral arrangements.
- Bow Tie: A type of necktie worn as part of formal attire, usually made from silk or cotton.
- Butterfly Bow: A more elaborate bow with multiple loops, often used for decorative purposes.
- Pom-Pom Bow: A fluffy, round bow created by gathering loops in a spherical shape, popular for festive decorations.
Each type of bow requires a slightly different technique, so it's essential to familiarize yourself with the specific steps and materials needed for each one. In the following sections, we'll delve into the materials and tools you'll need, followed by detailed instructions for tying various types of bows.
Materials and Tools Needed
The right materials and tools can make all the difference when it comes to tying the perfect bow. Here's a list of what you'll need:
- Ribbon or Fabric: The most critical component, available in various materials like satin, grosgrain, velvet, and organza.
- Scissors: A sharp pair of scissors is essential for cutting clean, precise edges on your ribbon or fabric.
- Measuring Tape: Useful for ensuring your loops and tails are of equal length.
- Wire or String: Optional, but helpful for securing more complex bows.
- Bow Maker (Optional): A tool that holds the ribbon in place, allowing you to create bows more easily and consistently.
With these materials and tools at your disposal, you'll be well-equipped to tackle any bow tying project. In the next section, we'll provide a step-by-step guide to tying a simple bow, the foundation for many other bow types.
Step-by-Step Guide to Tying a Simple Bow
Let's start with the basics: the simple bow. This classic bow is versatile and can be used in various applications, from shoelaces to gift wrapping. Follow these steps to tie the perfect simple bow:
- Measure Your Ribbon: Begin by cutting a length of ribbon suitable for your project. A good rule of thumb is to use about twice the length you want your finished bow to be.
- Create the First Loop: Hold the ribbon's midpoint with one hand and form a loop with the other, leaving a tail hanging down.
- Form the Second Loop: With the opposite end of the ribbon, create a second loop that mirrors the first, leaving the tail hanging down.
- Cross the Loops: Cross one loop over the other, ensuring that both loops are of equal size.
- Pull Through and Tighten: Take the loop that is now underneath and pull it through the opening created by the crossed loops. Tighten the knot by pulling gently on both loops and tails.
- Adjust and Trim: Adjust the loops and tails to achieve the desired size and shape, and trim any excess ribbon from the tails.
With these simple steps, you can create a beautiful, symmetrical bow that will enhance any project. Practice makes perfect, so don't be discouraged if your first attempts aren't flawless. With time, you'll develop the skill to tie bows effortlessly and with confidence.
Tying a Bow Tie
The bow tie is a staple of formal wear, often associated with elegance and sophistication. Tying a bow tie can be daunting for beginners, but with practice, it becomes second nature. Here's a step-by-step guide to tying a bow tie:
- Start with the Bow Tie Around Your Neck: Place the bow tie around your neck, with one end slightly longer than the other.
- Cross the Longer End Over the Shorter End: Bring the longer end over the shorter end, creating an "X" shape.
- Loop the Longer End Underneath: Bring the longer end up and through the opening created by the crossed ends.
- Form the Bow Shape: Fold the shorter end into a bow shape, holding it in place with one hand.
- Wrap and Fold: Drape the longer end over the bow shape and fold it back on itself to form the second half of the bow.
- Thread the Bow Through: Thread the folded longer end through the loop behind the bow shape, pulling it halfway through to complete the bow.
- Adjust and Tighten: Adjust the loops and tails to achieve a balanced bow tie, then tighten the knot by gently pulling on the loops.
With these steps, you can tie a classic bow tie that complements any formal outfit. Remember to practice regularly, as tying a bow tie requires a certain level of dexterity and familiarity with the process.
Creating Gift Wrapping Bows
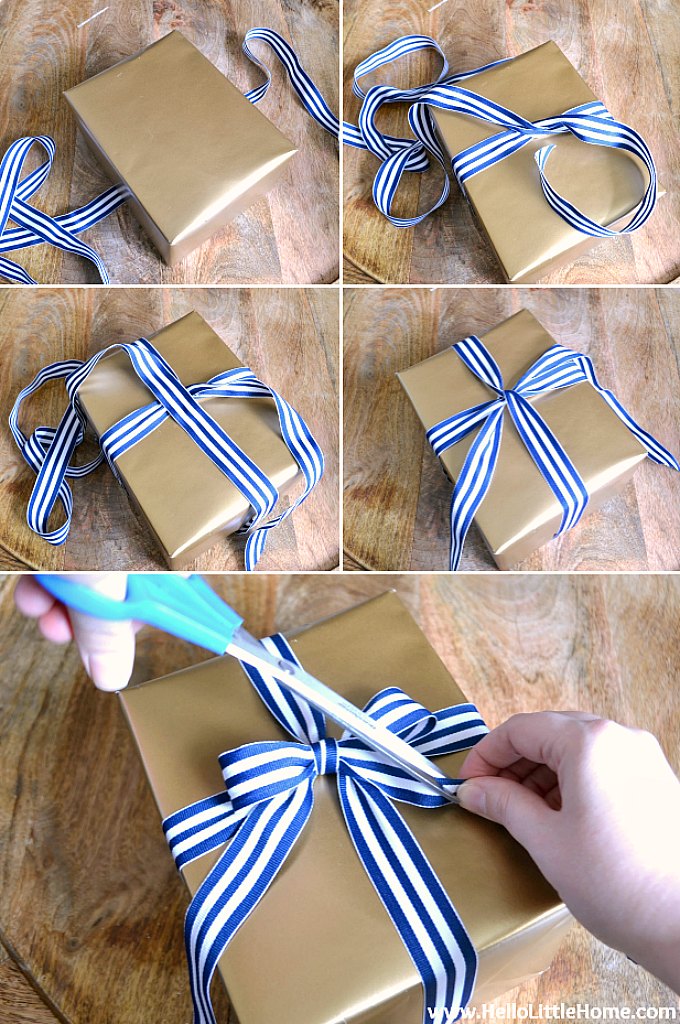
Gift wrapping bows add a special touch to any present, making it look beautifully adorned and thoughtfully prepared. Here's how to create a stunning gift wrapping bow:
- Choose Your Ribbon: Select a ribbon that complements your wrapping paper, choosing a style and color that enhances the overall presentation.
- Wrap the Ribbon Around the Gift: Wrap the ribbon around the box, crossing it at the top and bottom, and secure it with a knot.
- Create Loops: Create multiple loops with the ribbon, each of equal size, and stack them on top of one another.
- Secure the Loops: Use a piece of wire or string to secure the center of the loops, ensuring the loops are tightly bound.
- Fluff and Arrange: Fluff the loops to create a full, voluminous bow, arranging them symmetrically around the center.
- Attach to the Gift: Use tape or additional ribbon to attach the bow to the top of the gift, ensuring it is securely fastened.
This method creates a beautiful, eye-catching bow that enhances any gift, making it look special and inviting. With practice, you'll be able to create professional-looking bows that elevate your gift-giving to a new level.
Making Decorative Bows for Home Décor
Decorative bows are a versatile way to add charm and elegance to your home décor. Whether you're adorning wreaths, candle holders, or table settings, a well-crafted bow can make all the difference. Here's how to create decorative bows for your home:
- Choose Your Ribbon: Select a ribbon that complements your décor style, considering both color and texture.
- Create Multiple Loops: Create multiple loops with the ribbon, varying their sizes to add visual interest.
- Layer the Loops: Layer the loops on top of one another, alternating sizes for a dynamic effect.
- Secure the Center: Use a piece of wire or string to secure the center of the loops, ensuring they hold their shape.
- Fluff and Arrange: Fluff the loops to create a full, voluminous bow, arranging them symmetrically around the center.
- Attach to Décor Items: Use hot glue or additional ribbon to attach the bow to your chosen décor item, ensuring it is securely fastened.
With these steps, you can create decorative bows that enhance your home décor, adding a touch of elegance and style to any space. Experiment with different ribbon styles and colors to create unique, personalized bows that reflect your taste and creativity.
Troubleshooting Common Bow Tying Issues
Even experienced bow tiers encounter challenges from time to time. Here are some common issues and solutions to help you troubleshoot your bow tying endeavors:
- Uneven Loops: If your loops are uneven, use a measuring tape to ensure they are the same length before tying the bow. Practice maintaining equal tension on both sides.
- Loose Knots: Loose knots can cause your bow to lose its shape. Ensure you pull the loops and tails tightly while tying the bow, and consider using wire or string for added security.
- Twisted Ribbon: If your ribbon becomes twisted while tying, smooth it out and straighten it before continuing. Avoid pulling too tightly, which can cause twisting.
- Frayed Edges: To prevent frayed edges, use sharp scissors to cut your ribbon and consider using a lighter to seal the edges of synthetic ribbons.
By addressing these common issues, you'll be able to create beautiful bows with confidence and ease. Remember that practice is key, and with time, you'll develop the skills necessary to troubleshoot any bow tying challenges you encounter.
Advanced Bow Tying Techniques
Once you've mastered the basics, you may wish to explore more advanced bow tying techniques that add complexity and flair to your creations. Here are a few techniques to consider:
- Layered Bows: Create bows with multiple layers of ribbon, each of a different color or texture, to add depth and dimension.
- Intricate Knots: Experiment with intricate knot styles, such as the "double knot" or "figure-eight knot," to add visual interest to your bows.
- Embellished Bows: Add embellishments, such as beads, charms, or flowers, to your bows for added decoration and personalization.
- Oversized Bows: Create large, dramatic bows by using extra-long ribbon and additional loops for a statement piece.
These advanced techniques allow you to elevate your bow tying skills, creating stunning, unique bows that capture attention and admiration. As you experiment with these techniques, you'll discover new ways to express your creativity and enhance your bow tying repertoire.
Maintaining and Storing Your Bows
Proper maintenance and storage are essential for preserving the beauty and integrity of your bows. Here are some tips to ensure your bows remain in excellent condition:
- Store in a Cool, Dry Place: Keep your bows in a cool, dry place to prevent damage from humidity and heat.
- Avoid Crushing or Folding: Store your bows flat or hanging to prevent crushing or folding, which can distort their shape.
- Use Protective Covers: Consider using protective covers or boxes to shield your bows from dust and dirt.
- Spot Clean Gently: If your bows become soiled, spot clean them gently with a damp cloth and mild detergent, taking care not to saturate the fabric.
By following these maintenance and storage tips, you can ensure your bows remain beautiful and ready for use whenever you need them.
Bow Tying in Fashion and Its Impact
Bows have long been a staple in the world of fashion, adding elegance and sophistication to clothing and accessories. From bow ties and hair bows to bow-adorned dresses and shoes, bows have made their mark on the fashion industry. Here's how bow tying has influenced fashion:
- Symbol of Elegance: Bows are often associated with elegance and refinement, making them a popular choice for formal wear and high fashion.
- Versatile Accessory: Bows can be used as versatile accessories, enhancing the appearance of clothing, hairstyles, and even handbags.
- Timeless Appeal: The timeless appeal of bows ensures they remain a classic element in fashion, continually being reinterpreted and reinvented by designers.
The impact of bow tying on fashion is undeniable, with bows continuing to be a symbol of style and sophistication. As you master the art of bow tying, you'll gain a deeper appreciation for their role in fashion and their ability to elevate any ensemble.
Environmental Considerations in Bow Tying
In today's environmentally conscious world, it's essential to consider the impact of bow tying on the environment. Here are some ways to make your bow tying practices more sustainable:
- Choose Eco-Friendly Materials: Opt for ribbons made from sustainable materials, such as organic cotton or recycled polyester, to reduce your environmental footprint.
- Reuse and Repurpose: Reuse ribbons from previous projects and repurpose them for new creations, minimizing waste and maximizing resources.
- Support Ethical Brands: Support brands that prioritize ethical and sustainable production practices, ensuring your bow tying materials are responsibly sourced.
By incorporating these environmental considerations into your bow tying practices, you can contribute to a more sustainable future while still enjoying the beauty and artistry of bow tying.
Cultural Significance of Bows
Bows hold cultural significance in various traditions and customs around the world. Here's a look at how bows are used and interpreted across different cultures:
- Symbol of Unity: In some cultures, bows symbolize unity and togetherness, often used in ceremonies and rituals to represent the binding of relationships.
- Decorative Tradition: Bows are used in traditional decorations for festivals and celebrations, adding color and flair to cultural events.
- Historical Significance: Bows have historical significance in fashion and attire, reflecting the styles and customs of different eras and regions.
The cultural significance of bows adds depth and meaning to their use, allowing us to appreciate their role in connecting people and traditions across the globe.
Frequently Asked Questions
- What is the easiest way to tie a bow?
The easiest way to tie a bow is to follow the simple bow tying method: create two loops, cross one over the other, and pull through to secure the knot.
- How can I make my bow loops even?
To make your bow loops even, use a measuring tape to ensure they are the same length before tying the bow, and practice maintaining equal tension on both sides.
- What type of ribbon is best for decorative bows?
Satin, grosgrain, and organza ribbons are popular choices for decorative bows, offering a range of textures and finishes to suit different styles.
- How do I prevent my bow from coming undone?
To prevent your bow from coming undone, ensure the knot is tight and secure, and consider using wire or string for added stability, especially for larger bows.
- Can I tie a bow with any type of fabric?
Yes, you can tie a bow with various types of fabric, but some fabrics, such as silk or cotton, may require additional care and consideration for optimal results.
- How do I store bows to keep them in good condition?
Store bows in a cool, dry place, avoiding crushing or folding, and consider using protective covers or boxes to shield them from dust and dirt.
Conclusion
Mastering the art of bow tying is a valuable skill that can enhance your ability to add beauty and elegance to a variety of settings. From simple bows to more advanced techniques, this comprehensive guide has provided you with the knowledge and confidence to create stunning bows that leave a lasting impression. As you practice and refine your skills, you'll discover the joy and satisfaction that comes with crafting the perfect bow for any occasion.
Whether you're tying a bow tie for a formal event, adorning a gift with a decorative bow, or adding a touch of flair to your home décor, the techniques and insights shared in this article will serve as a valuable resource on your journey to becoming an expert bow tier. Embrace the art of bow tying, and let your creativity shine through in every bow you create.
For more information on bow tying and its applications, consider exploring additional resources and tutorials available online. With dedication and practice, you'll continue to elevate your bow tying skills and create beautiful, memorable bows that enhance every occasion.